

Faux DIY Concrete Planters With Spray Paint
Posted by admin on
How to create designer look for less DIY concrete planters with a faux finish using leftover neutral cans of spray paint.

This project definitely started out as a whim sort of thing.
Robert will tell you I have a leftover spray paint hoarding problem. I mean if you were to walk into our garage on any given day, you would find a cabinet chock full of half used cans of spray paint because ya know… #DIYerProblems
Why throw out perfectly good spray paint when you might use it one day on some random object?
Well, enter said random object: a couple of resin Walmart planters.

Since I did this rustic table lamp makeover a few weeks ago, I had some textured spray paint still in my stash.
So creating faux DIY concrete planters with the leftover paint seemed like the perfect solution to use it up while achieving a designer look for our front porch.
Fluted Concrete Planters Designer Inspiration
I don’t know if you’ve mosied around looking at planters on the high end retailers’ sites lately, but Pottery Barn, Rejuvenation, Terrain, and West Elm all have these gorgeous fluted concrete planters that go for roughly $100-$300 each.
Then, I saw these DIY faux stone planters Jenna Sue Design made that are absolutely stunning if you wanted to attempt a more authentic version. She made these hypertufa stone planters that are amazing too.
Faux DIY Concrete Planters Using Spray Paint
But for mine, I wanted to attempt to use what I had in the spray paint stash.
Robert is so proud of me for dwindling my hoarding pile, by the way. (I did it, babe! Only like 40 half used spray paint cans to go! Haha! Okay, I’m exaggerating maybe a little.)
TIP 1: You can adapt a wide array of neutral paint colors you have in your stash to fit this project. Don’t feel the need to buy exactly what I used. A variety of gray, beige, black, and tan spray paints (preferably flat sheen) in various amounts can do the job.
TIP 2: This project works best with textured spray paint. However, if you only have flat paint, sprinkle sand onto the still wet freshly spray painted surface right after the first coat. Then, cover the sand layer with a second coat of spray paint to achieve the similar texture of concrete.
Supplies
- Planter pot of your choice (I used 2 of these fluted planter sets)
- Exterior rated spray primer (A must for proper adhesion)
- Light gray spray paint (I used this textured light gray paint)
- Black spray paint (I used this black chalk spray paint)
- Beige spray paint (I used this beige camo spray paint)
- Tan spray paint (I used this textured tan spray paint)
- Taupe spray paint (I used this textured taupe spray paint)
- Spray clear satin oil-based spar urethane (A must for sealing the painted surface to protect from the outdoor elements)
- Optional: Silica sand (See Tip 2 above – if you’re not using textured spray paint)
- Drop cloth or spare cardboard
- Potting soil and flowers/plants of your choice

Steps
Step 1 – Prime
I did this project on a warm, sunny day on some scrap cardboard as a drop cloth in our yard. Definitely don’t attempt this one when it’s cold or very humid outside as the texture most likely won’t set up correctly.
Spray one light even coat of primer all over the exterior of the planter and let dry for proper paint adhesion.

Step 2 – Apply 1 Thin Even Coat of Textured Light Gray Spray Paint
Slow and steady wins the race with spray paint. Apply spray paint in a sweeping motion, always moving, slightly overlapping your previous pass to create a thin, even coat. Avoid a thick coat to prevent dripping.
If you’re not using textured spray paint: While your first coat of flat paint is still wet, dust the planter’s surface with silica sand until covered in a thin layer. The first coat of wet paint acts as the sand’s “glue”. Apply another light coat of light gray spray paint to the sandy surface to cover the sand with color.
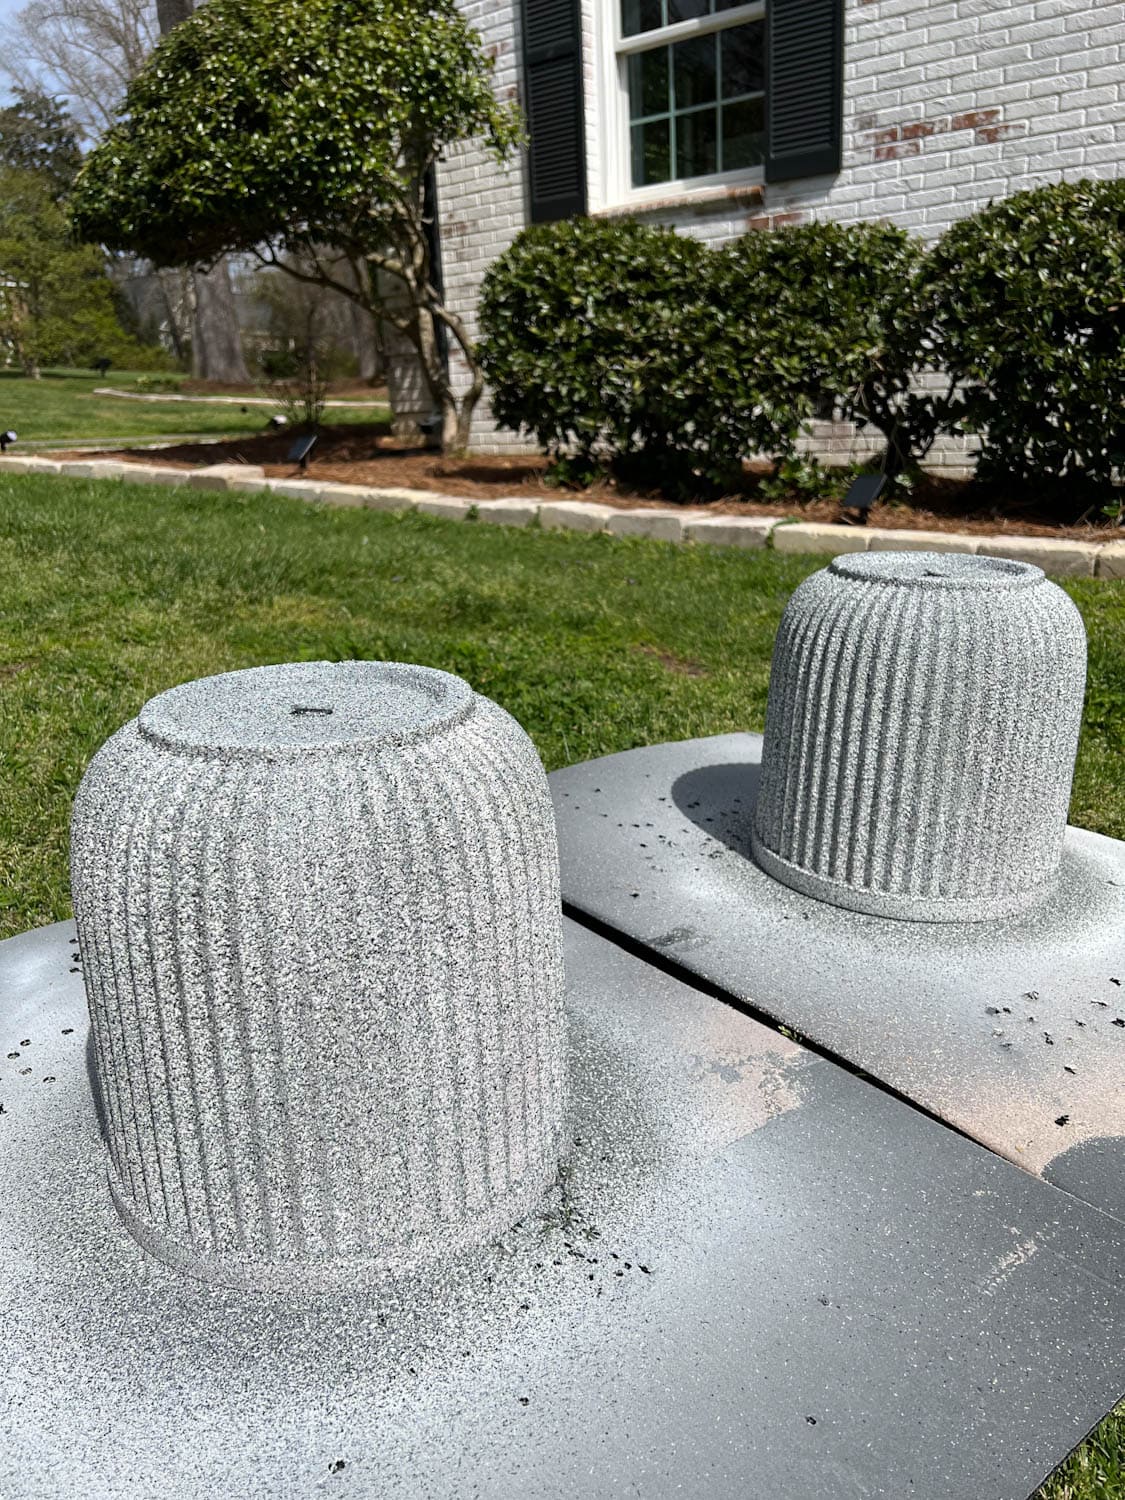
Step 3 – Apply Sporadic Uneven Coats of All Spray Paint Colors
Here’s where you can get a little “artistic” with your look. There is really no right or wrong way to do this step.
You don’t want to paint your planters all one even color because that’s not the nature of concrete. Real concrete planters are splotchy with variations of light gray, dark gray, beige, tan, and black, and you want to mimic that natural look.
So start by spraying a very light, uneven, haphazard coat (still avoiding drips) of the second paint color all over the planter, allowing some of the first paint color to peek through underneath. Repeat that same uneven, haphazard painting process with the third color, the fourth color, and so forth if you’re adding more.
The more imperfect it is, the better because concrete itself is imperfect.


Step 4 – Seal with Spar Urethane
Once the spray painted surface is 100% dry after a couple of hours, apply 2-3 light, even coats of spray clear oil based spar urethane to protect the paint from any moisture outdoors. Be sure to allow each coat to completely dry before applying an additional coat of sealer.

The Finished Faux Concrete Planters
Not bad for using up a bunch of paint leftovers, huh? (By the way, don’t forget to pop out the drainage holes for your flowers.)


If you have to go out and buy all of these materials to make your DIY concrete planters from scratch, I don’t think this project would be extremely cost effective.
But it’s great when you only need to buy 2-3 project supplies to supplement alongside materials you already have in your stash considering the price of the real version.
Plus, it’s relatively fast since mixing bags of concrete, working with concrete around molds, and allowing proper dry time is a lengthy process when doing the real thing.
You can see more small porch ideas on a budget here to get warm-weather-ready. You can see how to distress painted outdoor planters and build a window planter box here too.
Related Spray Painting Projects
- How to Spray Paint Bathroom Fixtures
- 15 Ways to Transform Your Entire House with Just Paint
- Knock-Off Painted Ceramic Bloom Vase Makeover
- DIY Light Fixture Made from a Repurposed Sunburst Mirror

The post Faux DIY Concrete Planters With Spray Paint appeared first on Bless'er House.